How Reveal Texutured Plane Ina Maya
Make sure Double Sided is checked. When it comes to putting it in a game engine youll want to find a similar setting and again make sure backface culling is off.
Modeling Muscles Of Biological Mice With Maya Useful Links Adobe Photoshop Quick Selection Tool Http Help Adobe Com En Us Photoshop Cs Using Wsfd9ba8c5 31ba 4fec 81f3 Cf04ee5295fca Html Layers Http Help Adobe Com En Us
Set up image planes in Maya.
How reveal texutured plane ina maya. The height of both the side and front view should also be equal. You can also create your top front and side views in programs such as Photoshop or Illustrator. One way to check is to do the below.
Up to 10 cash back This course is third course of Series How to Texture 3D Aircraft Model in Maya Substance Painter which provides an overview of Texturing and Exporting Textures for Rendering 3D graphics in the production. This creates an image plane and connects it to the camera. I know in Maya it works fine but actually Im trying to make a Sims 2 a game in case you dont know object.
For further help please upload a scene-file only leaf needed. Here is picture that shows what the problem will be if a plane has only one normal left is in game effect and right is in maya. Select the Render cam and press S on the keyboard to set a key frame.
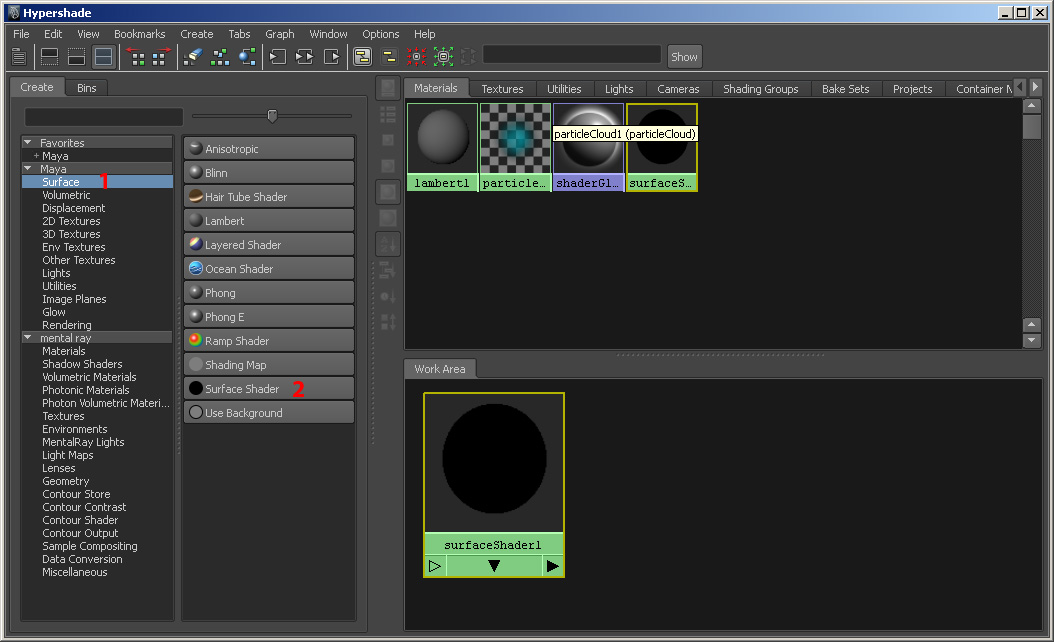
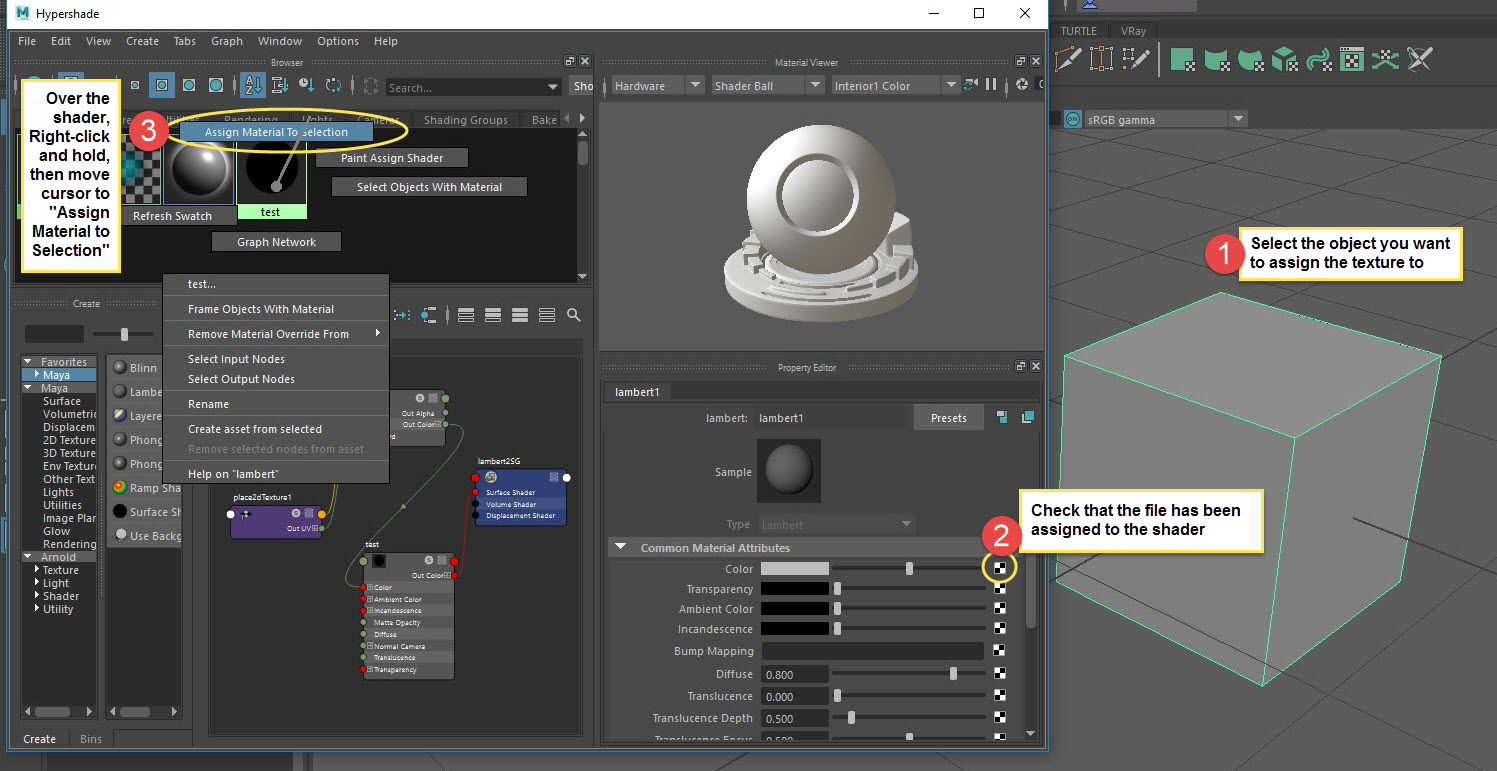
Create a basic scene with a plane rotated 90 degrees and an Arnold light. Right click and hold on the shader with texture assigned then select Assign to Selected Right-click on image and select Open in new tab to see a larger view of the image. Literally in your example all youll have to do is go to Lighting Two Sided Lighting and you should see your texture correctly on both sides.
The Terrain Ground Plane. This way you can see if the projection is working by moving the. From there youll find options to Import Image Import Movie and to load an existing Image Planes Attributes.
Create a single-faced plane 2. Meaning you can see through the textured planes to the objects behind them. So Ive been modeling and texturing in Maya for a few weeks now for a Unity project and every once in a while when I start to deal with planes they end up transparent.
Yep you are correct. Polygons Edit Mesh Merge components to center 4. All Id like to do is apply my leaf texture on both sides of the plane much like those seen in the environment screenshot I posted earlier.
If you want to use a double sided material just use aiTwoSided and assign the same shader to front and back as starting point. Through doing this the setup in Maya will be easier. Want to master Microsoft Excel and take your work-from-home job prospects to the next level.
Select the Scale tool r key then select the projection object and scale the projection. The normal line on the front of the projection should be facing the plane object. Step Eight Press the 5 key then the 6 key to preview the texture.
Create a primitive NURBS plane. Change the Rotate X value to -90. To add an Image Plane to your Maya camera go to your viewports View menu.
Open the attribute editor leftmost button in the very top right corner Click the tab labeled as your ObjectNameShape. Click the texture icon next to the Texture attribute. Jump-start your career with our Premium A-to-Z Microsoft Excel Training Bundle from the new Gadget Hacks Shop and get lifetime access to more than 40 hours of Basic to Advanced instruction on functions formula tools and more.
Create a single-faced plane 2. Click the projection object and open the Channel Box. I would simply create a plane scale it to match the image plane and apply the same texture.
Now with your plane selected in the Surface mode under the Edit NURBS menu choose Sculpt Geometry Tool. Well perform a basic example to get the hang of it before applying this technique to your own projects. The object showed in the picture is extracted from the game.
In the Create Render Node window that appears select the texture you want to use as a background for example an Environment Texture. I cannot seem to find anyone else with this issue. In addition when using the Camera Sequencer to play animation with image planes you must.
Make sure the width of your top and side views are equal. A quick guide on how to scale and repeat a texture in Maya. Want to master Microsoft Excel and take your work-from-home job prospects to the next level.
Beginning with a tour of the interface Animation Hacks shows what we will learn how to generate in ColorID map in Autodesk Maya. Maya has an option to create objects single-sided in the preferences you might want to turn that off if its on now. This tutorial shows you how to create and set up image planes in Maya.
Here youll scroll down to the Image Plane menu item. Buy Now 97 off Other. The reference image can be created with pencil and paper then scanned and saved as a jpg.
If the texture still does not show up test the functionality by creating brand new shader and apply it. If you plan to do a lot of modeling in Maya you will find it is easier if you set up reference images on image planes. By this I mean if youre rendering through your perspective camera it would render the persp cameras Image Plane as a Background Shader but if you want to render the Side Cameras Image Plane it wouldnt work.
Just apply a texture to an Arnold material thats it. Move to frame 200 and then rotate the camera to a slightly different angle. On the right side of the screen the options will pop up.
Set the Type attribute for the image plane to Texture. In the channel box edit the inputs and set the Patches to 50 50. Rotate the top view by 90 degrees counter clockwise Image Rotate Canvas 90 CCW so that the nose of X-38 will be pointing down.
Scale it to 100 100 100. Click the section labeled Render Stats. View image plane image plane attributes imagePlane1 or you can go into the camera attribute editor and select the imageplane tab there View Camera Attribute editor then choose the imagePlane1 tab If you look in the image plane attributes down where it says placement there is a field for rotate This is how you rotate.
How to Model with an Image Plane in Maya. Select 2 of the 4 vertices or just 1 single edge 3. Open the hypershade and create the new basic aiStandardSurface and use a texture as the base colour.
Hit the delete key To get an isosceles triangle. Click your object in Maya. Beginning Maya 2013 the imagePlane node which was previously a dependency node is a shape node in other words a DAG node.
The imagePlane transform and imagePlaneShape nodes can be accessed from the OutlinerFor more information see Whats New in API. Its rendered double sided by default. Modeling with an Image Plane Maya 2012 Tutorial.
Offline Send Message TTools polycounter lvl 4 Feb 2018. Image planes are used as reference images as you create your model. Select one of any of the 4 vertices 3.
This connects the texture to the image plane. Upgrade to Quora to access this answer.

How Are Textures Assigned To The Back Of Planes In Maya Polycount


Komentar
Posting Komentar